Chip budding is basically slicing upward through the bark to
reveal the cambium, then sliding the bud up into the slice. As with T budding,
the bud should be the same size or narrower, from a thinner gauge bud stick than
the stock. You can easily bud something from a quarter inch thick bud stick to
an inch thick stock, but not vice versa.
As with any budding or grafting, you need good cambium to
cambium contact. As you know, cambium is the juicy green layer just beneath the
bark or skin. It's the circulatory system of the plant. It's basically stem
cells. It becomes whatever is needed depending upon what conditions it
encounters. It's what calluses to become roots when provided darkness and
dampness, as with wrapping cuttings. It becomes scar tissue to heal wounds if left exposed to air. When in
contact with other cambium, it knits the two pieces together, forming new
capillary action between them so the two pieces become one. If you push the
prickles off a fresh flower stem and then observe the juicy, brighter green
tissue exposed where the prickles were, that's cambium.
You want to make sure the buds have cambium and not pith
behind them. A bit is acceptable and will work, but the more cambium tissue
remaining on the bud, the faster and stronger the knit will be. Cambium won't
grow to pith and vice versa, so the more wood behind the bud, the greater the
chances of failure or of future breakage if the cane suffers trauma or wind
stress.
If you practice slicing buds from canes you don't care about,
you will quickly learn to see whether there is too much pith or not and how to
more consistently remove the buds with the correct tissue behind them. The
smaller bud has cambium; the larger has less cambium and more pith. Had I made
the cut shallower for the larger bud, there would have been less pith and more
cambium exposed.


If the brighter green rings around the perimeter of the shield
make decent contact with the cambium of the stock, this bud may work, but the
smaller one above has cambium across its interior surface, so its chances and
speed will be greatly increased over the larger one.
An interesting side line..I've found it is possible to cleave
the bud in half top to bottom, resulting in the bud knitting to the stock and
growing, as well as the remaining tissue in the original plant growing a new
cane. Of course this requires you to harvest the bud from a cane remaining on
the original plant. I've done it so I didn't have to remove much wood from a
smaller, struggling plant. It's almost like splitting a liver to transplant half
of it to another person.
Once you've removed the bud or buds you wish to insert into
the stock, you need to keep them moist until they are inserted. Mel Hulse, who
used to be the volunteer coordinator for The San Jose Heritage Rose Garden, kept
the bud on his tongue until he finished the slice to insert it into. I use
either a shallow glass of water in which I put the bud stick to prevent it from
drying, or a shallow jar lid with water in it. If you drop the bud into a glass
or cup of water, you have to dig it out of deeper water which can be
frustrating. If it's in a shallow lid or small pan of water, it's easier to
remove from the water to insert into the stock. Both bud and scion can be
thoroughly wet. It isn't so much water getting in to the slice in the stock as
it is dirt and fungal or bacterial contamination from the soil that can cause
failure.
You may either make the cut in the stock first then harvest
the bud or buds, or vice versa. As long as the buds are kept moist, you can wait
hours to insert them.
Ideally, you want to de bud your stocks before you root them.
It's easier, faster and you'll be less likely to damage the inserted bud
removing the buds from the stock. It may surprise you to discover how deeply you
need to slice into the stock to remove not only all of the primary bud tissue,
but also the guard buds (one on each side of the primary bud) so they don't
later become suckers.
Making the cut. It may be easier to look at the photos than
for me to explain them. Notice the brighter green, juicier rings around the
perimeter of the cuts. That is what you want to see on the reverse of the buds
and (ideally) across the surface of the cut. If you don't, then you want to
match the cambium on the bud reverse to the ring of cambium around your cut
edges. All it takes is one contact point for it to knit together and grow. The
more contact, the faster it puts out growth and the stronger the joint, but like
Brylcreem, "a little dab will do you."


Then, tie it in securely. I like the Parafilm products. You can find the Parafilm 1/2" wide budding tape very inexpensively on Ebay. They
stretch, increasing the pressure holding the two plant pieces together.
That reduces "bleeding" from the wound and allows for a stronger bond. Parafilm
also adheres to itself so it doesn't have to be tied to remain where you wrapped
it. I often even wrap across the bud itself, burying it under layers of
Parafilm. The film deteriorates in the heat, water and Ultra Violet and
will begin splitting as the plant thickens. Buds can actually grow through it so
you don't have to remove it as the bud grows. Wrapping across the bud also helps
prevent it from drying out until it knits to the stock, drawing moisture and
nutrients from the stock.
You can see the film splitting in this shot.

When the stocks are vigorously growing, buds should knit to
the stocks in roughly three to four weeks. The less actively they're growing,
the longer it takes to knit together and increasing the chances of failure.
Often, as long as more mature buds are used and the stocks are growing very
vigorously, they will begin pushing new growh at three to four weeks after
insertion. You can actually use fairly mature buds as long as they haven't
literally begun unfurling leaves. The flatter the bud, the longer it will
require to mature and begin growth.
After three to four weeks, as long as the buds are still
green, they should have taken. You may choose to leave them alone until the
following spring/summer if you're concerned they will be too soft to withstand
the extremes your winter may give them if it's later in the year. You may do the
traditional breaking the tops just above the bud so it remains attached,
supposedly continuing to feed the stock and bud until the bud begins growth. Or,
you may elect to sever the stock above the bud at the three to four week mark.
The main issue I encountered was extreme bleeding from the cuts. I looked for
the pruning stick I used to see in the nurseries, but could find none. I didn't
want the spray asphalt as it would make a huge mess. I tried tying the Parafilm
over the top like a bandage and it worked for a few of the weaker bleeders. I
also tried Elmer's Glue, which must be applied either after the sun begins
setting or before the sun hits the stocks, as when the sun isn't shining on
them, they stop bleeding. Once the sun shines on the stocks, they bleed like
mad. What finally worked best was dripping candle wax on the wounds before the
sun shined on them so the dried wax would seal the capillaries. Some required
several applications to finally fully seal the wounds. Don't worry if you drip
wax on the buds. It isn't hot enough, nor enough of a "seal" to harm them. Once
I stopped the sap loss, the increased pressure in the stocks began pushing buds
like nobody's business!
If you have many of the same bud and want to conserve stocks,
and if you've rooted longer pieces, you may insert many buds in each stock. You
may also root a long whip of a rambler or climber and bud along the more
horizontal surface of the longer whip. That will actually push growth faster for
the same reason training climbing canes to a more horizontal direction will push
lateral growth along the cane. The multiple buds growing on the same stock can
be used to provide extra cuttings for own root propagation, or, if you allow
enough room between them, once they have knit and begun growing, their first
winter they may be separated and wrapped or otherwise treated as individual
cuttings, producing individually budded, rooted plants.

If you have a mist system set up, you can bud to unrooted
stocks, then root them while the buds knit. Sequoia did that for mini standards
all the time.
The first cane to grow from the inserted bud is the "maiden".
When you read older rose books and they talk about the finest exhibition blooms
are from "maidens", this is what they mean. I let them grow out and flower so
they are mature when I cut them and so their foliage begins feeding the stock.
You have to cut the maiden back pretty far, close to the stock, but leaving a
bit of tissue there to potentially provide a few buds from that main cane.
Cutting it back close to the stock encourages the guard buds to break into
growth, producing the multi branched growth you look for when selecting a bare
root. The "one cane wonder" bare roots are usually un cut maidens. Mistakenly,
we tend to leave that original main cane so all future growth comes from it,
when we SHOULD cut it back to an inch or so to encourage side branching from the
guard buds.
See the main bud in the center and the two guard buds, one on
either side?


That's what you want to cut sufficiently deep to remove when you de bud the stocks to prevent suckers. There
is enough growth material from all three buds remaining in this stock to produce
suckers from all three. Plus, I removed enough material of all three to produce
new growth once inserted into a stock. That goes back to splitting a liver
above. And, this illustrates why simply cutting a sucker off results in the
growth of two or more from that cut, and why they have to be ripped or dug from
the stock.
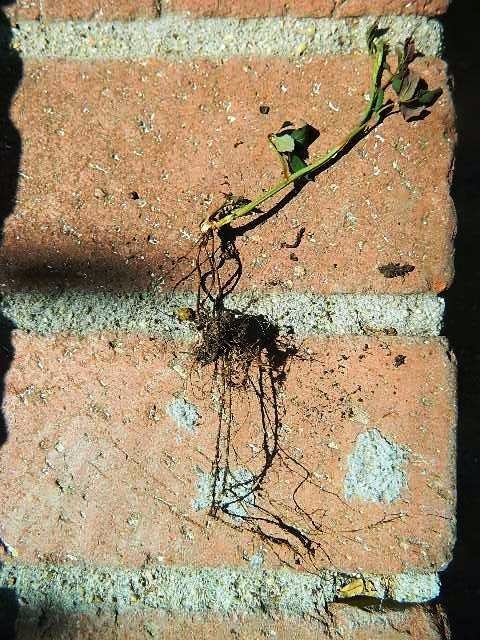
This is one I left too long and it actually set out its own
roots.


You actually don't HAVE to leave the top flap on the cuts to insert
the top of the shield under. It makes it easier, but it isn't absolutely
necessary. If both the stock and shield (scion) have droplets of water on them,
the water will act like glue, causing them to adhere to one another until you
tie them in.


Don't worry if your results look inelegant. With practice,
your 'elegance' ability will significantly improve and it doesn't seem to make a
bit of difference to the plants. I have quite a few where there is a lot of scar
tissue, thickened cambium, between the bud and stock and they're growing and
flowering just fine. Some are going to make Grade 1 budded plants fast. Others
will make Grade 2 or 1.5 and take their time. Some of that depends upon the
variety, some on the size and maturity of the buds used. Prevailing weather
conditions probably play a role, too.
The most common causes for bud failure are:
Insufficient cambium layer on the back of the scion/too much
pith
Mismatched cambium between the scion and wound in the
stock
Buds drying out prior to insertion
Stocks drying out prior to the buds knitting
As long as you've gotten the stocks growing vigorously, keep
them well watered for the next month or a bit longer to keep that sap flowing
freely so the buds knit and start growing ASAP. They don't require "full sun"
and may even perform better in fewer hours than they normally might in your
climate. In the "garden" mine would usually receive six to eight hours of sun.
In the front walled garden, they receive only three to four hours of direct sun,
with strong, indirect light the remainder of the day. Budding works almost
flawlessly in front and fails out back.
If you really catch the bug for budding, you can raise your own rose
seedlings, root pieces from the more vigorous types then bud to them as they
would be RMV free and could provide you with a steady source of root stocks. Or,
you can plant a mother plant of the type you wish to use and continue rooting
pieces of it for each stock you desire. I hope you have an outlet for the extra
budded plants you will probably generate. If you're already pretty tapped for
room, get ready! You're very likely going to need to start some new rose
friendships to take care of your "excess"!